
GPanda GLS Connect
GPanda GLS Connect creates GLS shipping labels directly from your WooCommerce orders — individually or in bulk. Recipient details are pulled automatically from the order, so there's no manual retyping and no address mistakes. The entire WordPress admin interface is in Slovenian.

Latest plugin version
Everything for GLS shipping, without manual data entry
One-click labels
Create a GLS label for a single order in one click — home delivery or GLS Parcel Locker / Parcel Shop.
Bulk printing
Select multiple orders from the order list and create or reprint up to 4 labels on a single A4 sheet in one step (2×2 or 4×1).
Every printer type
Supports A4, the GLS Connect device, and thermal printers (Thermo, ThermoZPL, ShipIt).
Label management
Cancel a label, refresh the live GLS shipment status, or re-download a lost label — all directly from the order.
Shipments page
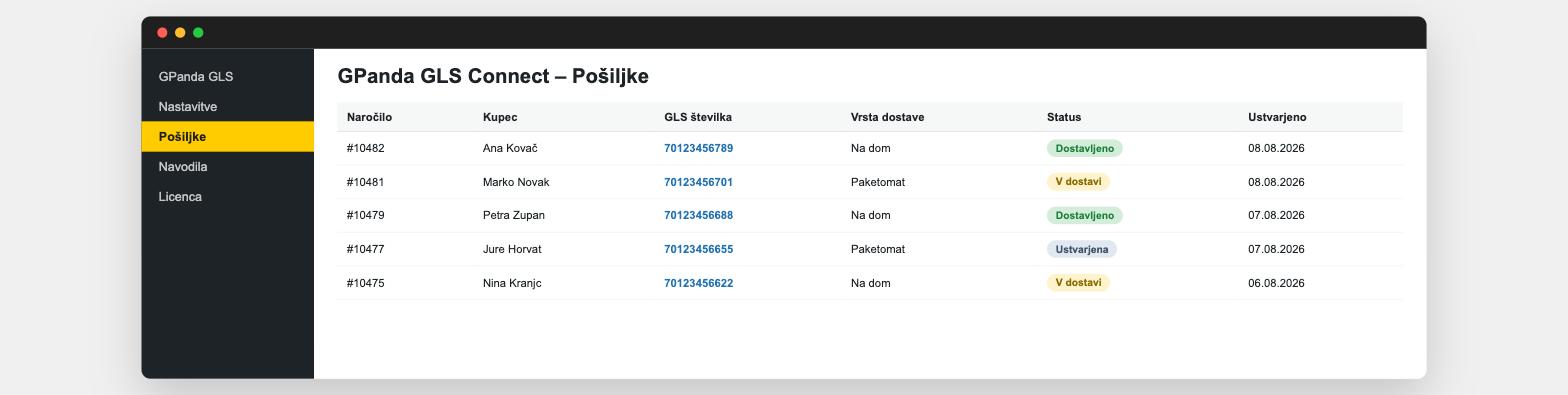
See every order with a GLS label in one place, with a click-through to tracking and the latest known status.
Additional GLS services
Contact Service (courier calls before delivery), FlexDelivery/FlexDeliverySMS, Preadvice SMS, and SMS with custom text.
Tracking in emails
Shipment tracking is shown automatically on the order and in the customer's emails.
HPOS and automatic updates
Supports WooCommerce's new order storage (HPOS) and automatic plugin updates tied to your license.
Home delivery or GLS Parcel Locker
At checkout, the customer chooses home delivery or a GLS Parcel Locker/Parcel Shop via the official GLS location map.
- Contact Service — the courier calls the recipient before delivery
- FlexDelivery / FlexDeliverySMS — the recipient chooses delivery options via email or SMS
- Preadvice Service — SMS with the expected delivery time
- SMS Service — SMS with custom text
For every Slovenian WooCommerce store with its own GLS contract
that wants to prepare shipments faster, without manual data entry. Regular updates, free installation help, and email support are included in every plan. Sold by: DOUX d.o.o.
One price, no surprises
- Unlimited GLS labels
- Bulk printing
- Every printer type (A4, GLS Connect, thermal)
- Regular updates
- Email support
Usage instructions
Plugin version: 1.1.4 · Author: GPANDA WEB (Osterman Jurij s.p.)
1. Installing the plugin
Install the plugin on your WooCommerce store using one of the following methods:
- WordPress admin → Plugins → Add New Plugin → Upload Plugin, select the .zip file you received, and click Install Now.
- Or via FTP/file manager: upload the
gpanda-gls-connectfolder to/wp-content/plugins/.
After installation, activate the plugin. It requires WooCommerce to already be installed and active.
2. Activating the license
Go to GPanda GLS → License, enter the license key you received by email at purchase, and click Activate License.
Without an active license, the plugin won't create new GLS labels (existing settings and data remain untouched). The license is checked in the background and is tied to your store's domain.
3. Basic setup
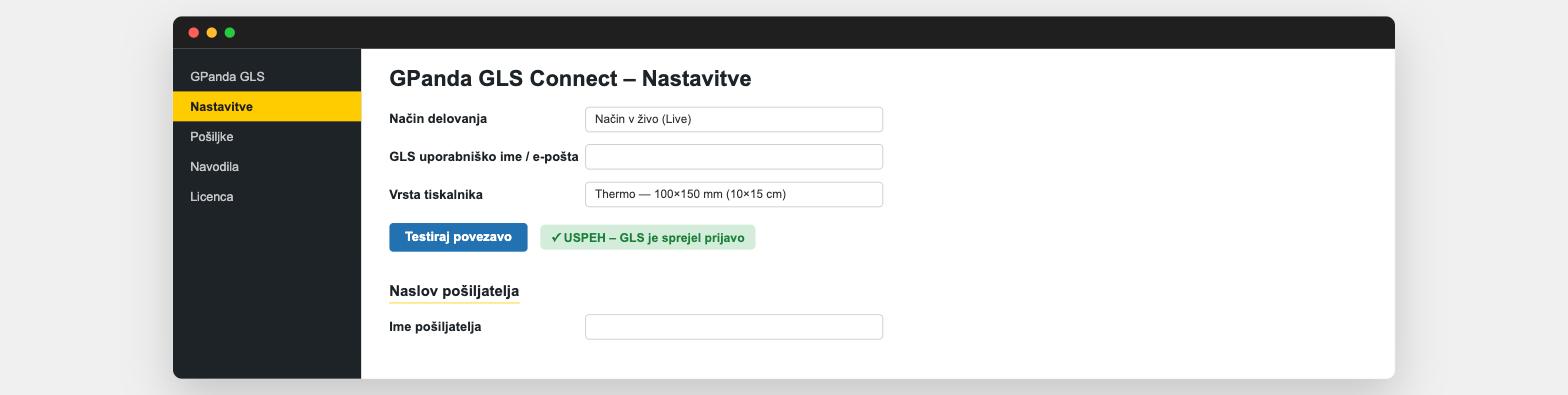
Go to GPanda GLS → Settings and enter:
- GLS username/email and GLS password (provided by GLS Slovenija).
- Client number.
Recommendation: leave Operating mode = Test mode until you've confirmed the labels are correct, then switch to Live mode.
After entering your details, click the Test Connection button — the plugin immediately checks with GLS whether the username, password, and operating mode are correct, and shows SUCCESS or FAILED.
Also enter the Sender/pickup address — this is the address GLS collects parcels from.
4. Creating a GLS label for an order
Open any order in WooCommerce. In the GLS Label sidebar box, click Create GLS Label.
Once the label is successfully created, the order is automatically marked as Completed, and the GLS tracking number appears on the order, in the order list, and in the customer's email.
In the same box, you can later:
- Cancel the label (Cancel Label).
- Refresh the live GLS shipment status (Refresh Status).
- If the local PDF file is lost, re-download it directly from GLS (Re-download from GLS).
5. Overview of all shipments
The GPanda GLS → Shipments page lists every order with a GLS label: the order, customer, GLS number (click to open official GLS tracking), delivery type, latest known GLS status, and creation date.
The Refresh All Statuses button on this page updates the status for every listed shipment at once. The same GLS status also appears in the GLS column on the standard WooCommerce order list.
6. Printing labels — printer types and sizes
In Settings, under Printer Type, choose the format that matches your printer: A4, the GLS Connect device, or thermal printers (Thermo, ThermoZPL, ShipIt).
Tip: if you get a label in the wrong size (e.g., a square instead of the expected shape), contact GLS Slovenija support (it@gls-slovenia.com) and confirm that your account (Client number) correctly supports the selected printer type.
7. Bulk printing from the order list
On the order list (WooCommerce → Orders), check the boxes to select multiple orders, then choose from the bulk actions dropdown:
- “GLS: Create and print selected (A4)” — for orders that don't yet have a GLS label. Creates labels for all selected orders in a single call to GLS and returns one A4 PDF with up to 4 labels per sheet.
- “GLS: Reprint selected (A4)” — for orders that already have a GLS label. Re-downloads the existing labels from GLS and merges them into one A4 PDF for printing (no new labels or costs).
8. Delivery to a GLS Parcel Locker / Parcel Shop
When a customer chooses GLS Parcel Locker delivery at checkout, the GLS map opens for location selection. The PSD delivery address mode setting should normally be “GLS location/Parcel Locker”, unless GLS support explicitly requires the customer's address.
9. Additional GLS services
Under GLS Additional Services, you can enable:
- Contact Service — the courier calls the recipient before delivery.
- FlexDelivery Service / FlexDeliverySMS Service — the recipient chooses a delivery option via email or SMS.
- Preadvice Service — SMS with the expected delivery time.
- SMS Service — SMS with custom text.
These services apply to home delivery only; for Parcel Lockers, GLS generally doesn't allow combining them with the PSD service.
10. Troubleshooting and errors
If label creation fails, the error message appears directly in the GLS Label box on the order. The most common causes are:
- A missing or incorrect postal code.
- A house number that can't be parsed from the address.
- An invalid selected GLS Parcel Locker.
In these cases, correct the order or ask the customer to re-select the GLS location at checkout.
For further help, email support is available and included in every license plan.
